How to Draw Side Face of a Guy Easy
Drawing faces is quite strange because the approach is completely different depending on which angle you are drawing a face from. However, side-profile drawing doesn't have to be difficult once you understand how to use guidelines to assist you. A side face drawing is a great way to capture the face uniquely as it emphasizes the structure of the face and head in very specific ways. Learning how to draw a face from the side is also quite a nice skill to have because it is nice to be able to draw faces from different angles in a single artwork. Side-profile drawing can be used in all sorts of ways, especially in artworks where there is more than a single figure. The face side profile is also the easiest way to draw a face as it requires only a few aspects of the face to be drawn.
Table of Contents
- 1 A Guide to Drawing a Face from the Side
- 1.1 Necessary Materials
- 1.2 Preparation
- 2 Instructions on How to Draw a Face from the Side
- 2.1 Drawing the General Shape of the Head
- 2.2 Creating Gridlines
- 2.3 Drawing the Nose and Lips
- 2.4 Drawing the Eye and Eyebrows
- 2.5 Drawing the Ear
- 2.6 Drawing the Hair
- 2.7 Adding in Light Shading
- 2.8 Adding in Darker Shading with a Pen
- 3 Tips to Remember
- 4 Frequently Asked Questions
- 4.1 How Do You Adequately Draw the Eyes from the Side?
- 4.2 How Large Should the Head Be from a Side View?
A Guide to Drawing a Face from the Side
Learning how to draw a face from the side is quite simple because it can be drawn realistically using a few simple guidelines. This tutorial will break down the basic process of using simple guidelines that help us to define the face side profile as accurately as possible. The basic process can be applied to both male and female heads. However, in this tutorial, we will be drawing a female face-side profile.
Realistic side face drawing can seem complicated, but once it is broken up into a few digestible steps, we will see that the process is quite easy.
Necessary Materials
We will only need a few simple materials for this tutorial on how to draw a face from the side. We want to make sure we have a pencil for the early stages of forming the side-profile drawing using a simple grid system.
We will also want a ruler and an eraser because we will be creating a set of lines to help indicate the position of each facial feature within the side face drawing.
We will also want to make sure we have a ballpoint pen for the end of the tutorial to give contrast to the features, which will just emphasize their form and structure for more clarity. All these materials can be found online through the links below:
- Pencil
- Eraser
- Ballpoint pen
- Sharpener
- Ruler
- Good paper (200 g/m – 250 g/m recommended)
Preparation
Now that all our materials are ready, we can begin to prepare ourselves for the side-profile drawing process. We will be dealing a lot with measurements which means we will want to make sure that we can focus on each step for these face side-profile drawing steps.
A good suggestion would be to place yourself within a quiet space that will allow you to focus without any distractions.
Make sure that you have all your tools in front of you as well as a normal good-sized piece of paper. Once we are in a good space with all our necessary materials, we can begin with this tutorial on a side face drawing.
Instructions on How to Draw a Face from the Side
In this face-side profile tutorial, we will specifically be drawing a side view of a female side-profile drawing. We will learn how to create a simple set of measurements and grid lines, which will make the drawing process much easier. Once we have our gridlines, we will use them to place different features on the face. We will see how to scale and accurately draw each feature. From there we can play around with how we add shadow and detailing with our ballpoint pens to give the feature more contrast.
We want to make the features a little more distinct with our ballpoint pens after we have drawn them in pencil first. Now that we know what to expect, let us go through this tutorial on how to draw a face from the side view!
Drawing the General Shape of the Head
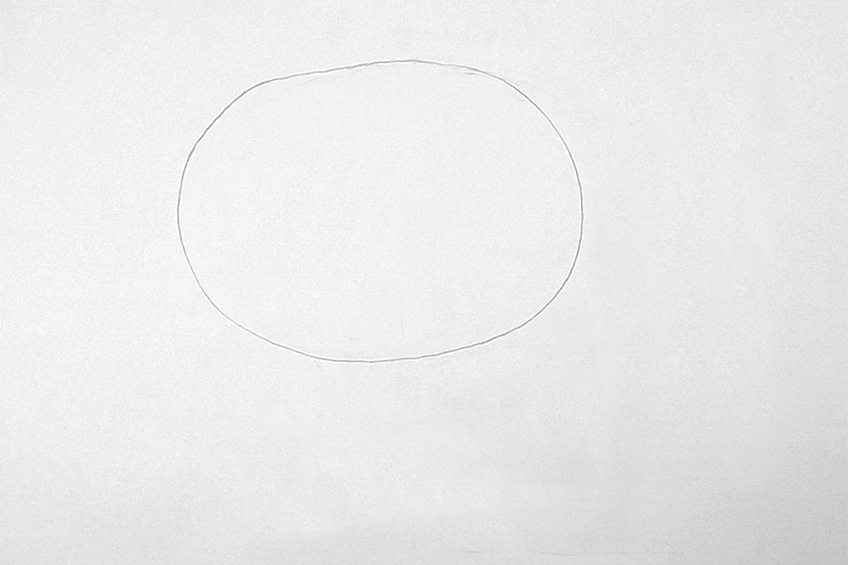
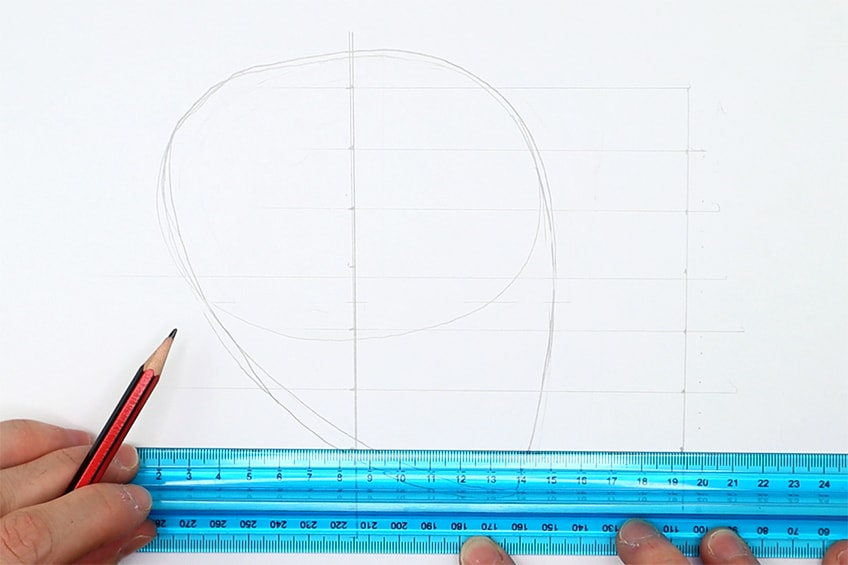
We want to start by drawing a simple oval shape. This can be as large as you would like, depending on how large you want to make your drawing. We can do this with our pencils.
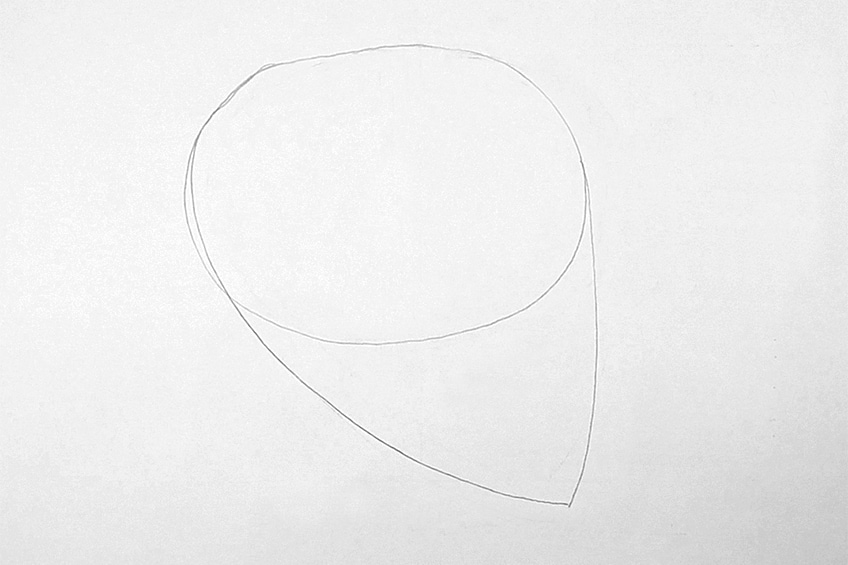
From there we will proceed to draw a triangular beak shape that points downward. We want to make sure that we start from the right side of the oval and draw vertically down the page, which we can then change direction.
Once we change direction, we can extend the line to the left side of the oval.
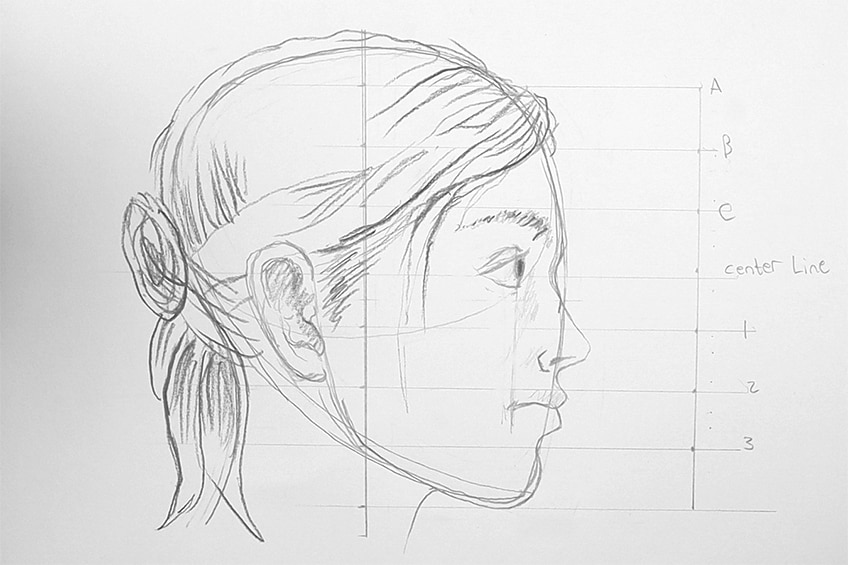
Creating Gridlines
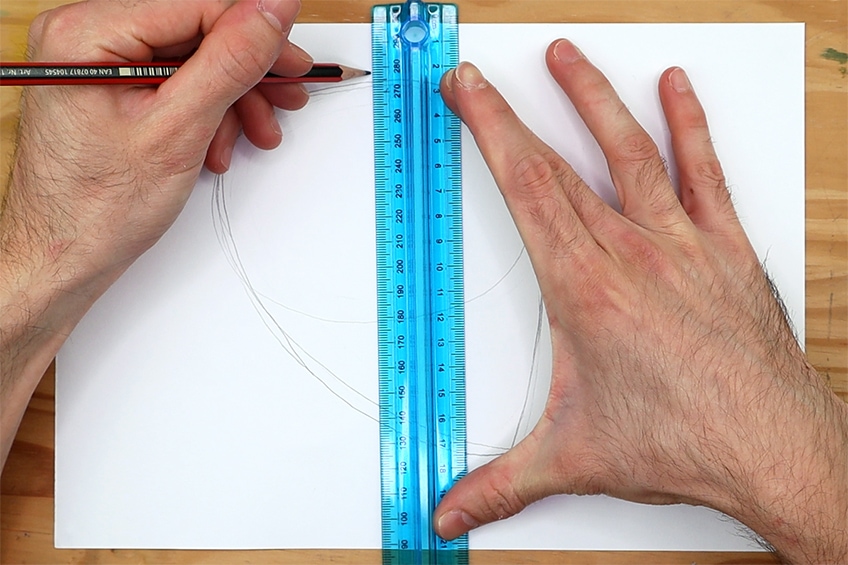
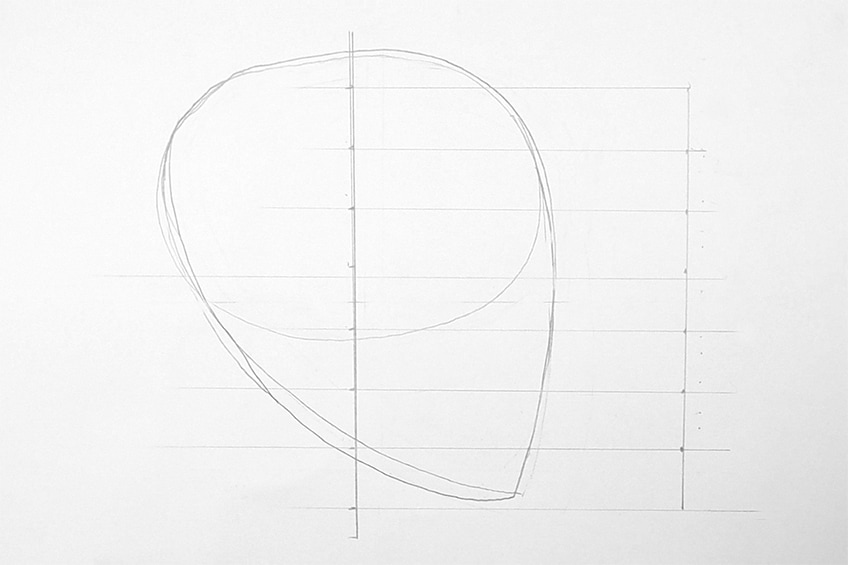
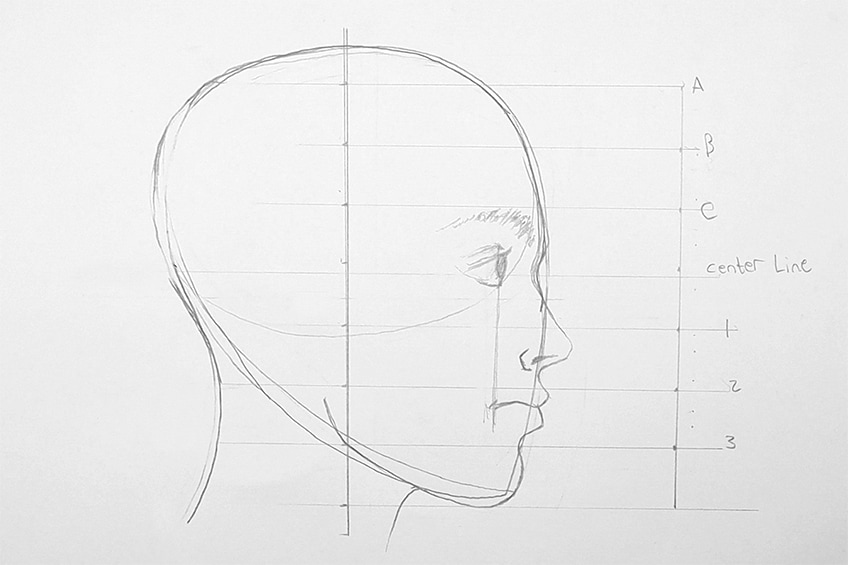
We now will proceed to draw a few grid lines. With your ruler and pencil, draw a vertical line that goes directly down the center of the oval shape.
We want to make sure that the beak shape is unevenly placed on either side of the vertical line. There should be more surface area within the triangular beak shape on the right side of the vertical line. This will eventually define the jawline's position in the drawing.
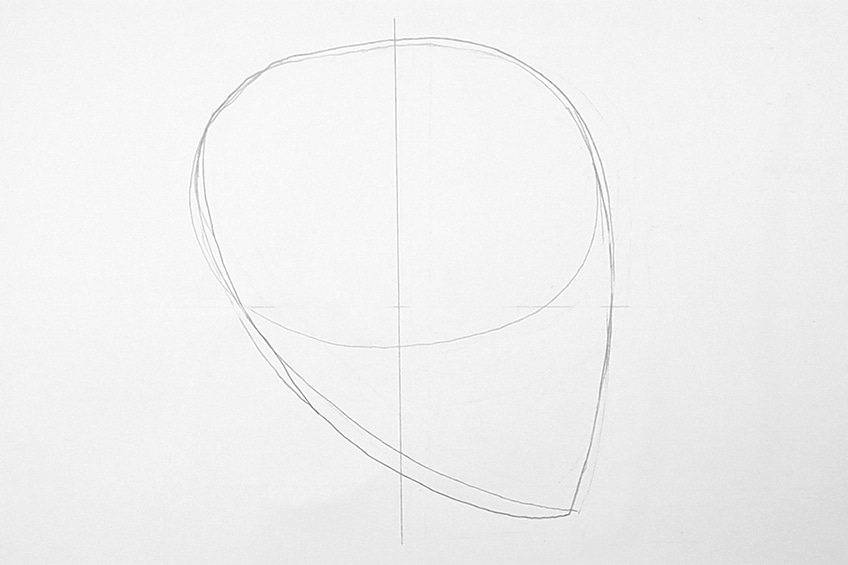
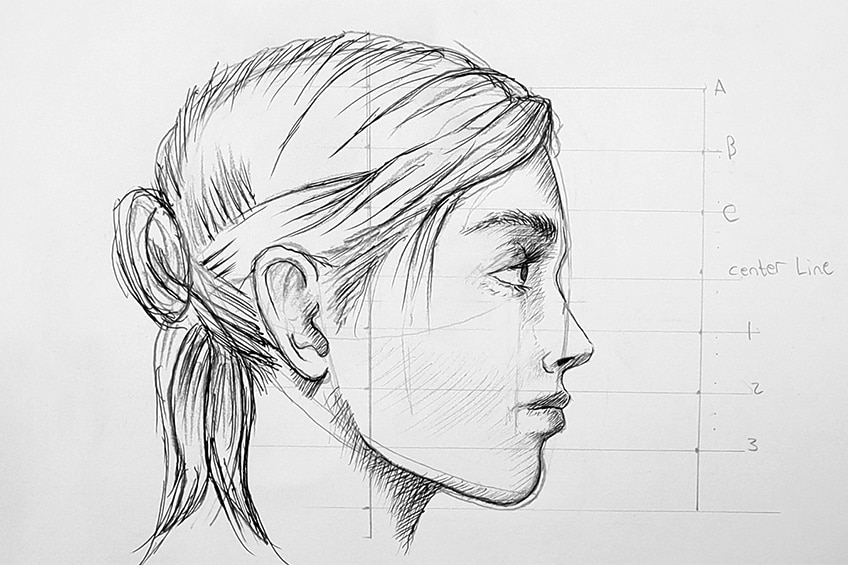
From here we want to divide the vertical line into six equal rows. From the top of the head to the bottom of the jaw, we should have an even set of six rows and seven lines. This will be determined by the size of your skull.
There need to be six rows and seven lines between the top and bottom of the head.
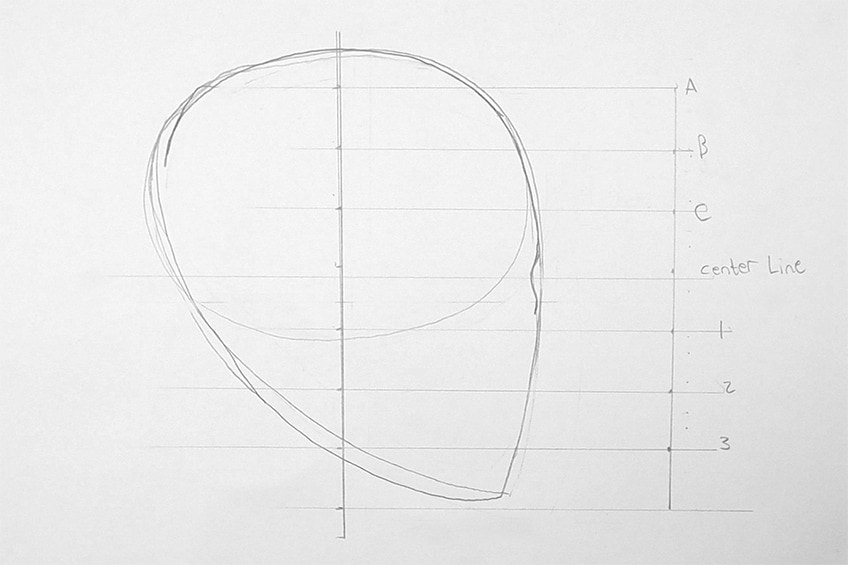
The main points should be between just above the jawline to just below the top of the head. A good suggestion is to have the first line drawn through the center of the skull. This can be just above the bottom of the oval shape.
From there you can evenly divide the rows into six, having a centerline with three more on either side of the horizontal line. The upper section will be labeled "A", "B", and "C" from top to bottom until the centerline.
Then, underneath the centerline, it will be labeled "1","2", and "3" from top to bottom.
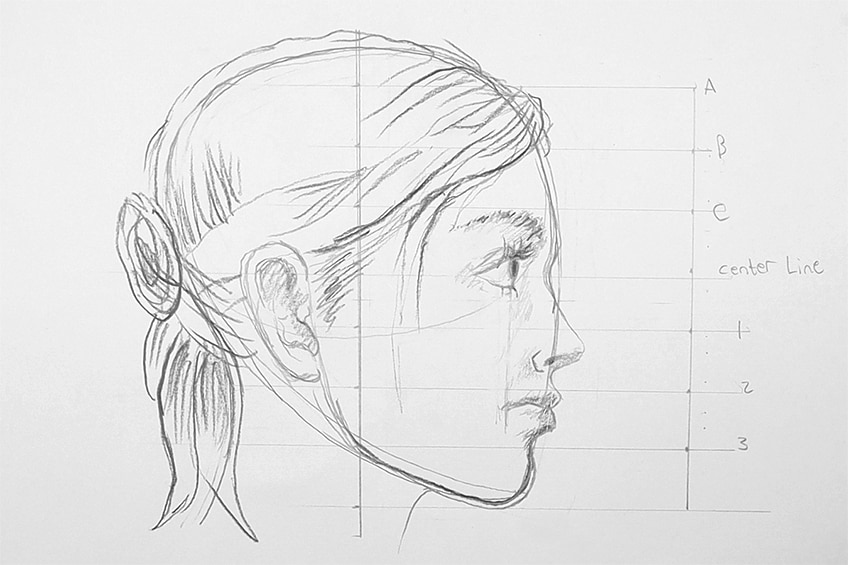
Drawing the Nose and Lips
We now can proceed to draw the eyebrow ridge and the nose. The eyebrow ridge will be drawn as a small indentation in the face. This will be drawn directly on the centerline of the face. This indentation can then extend into the nose shape which will fall between lines one and two.
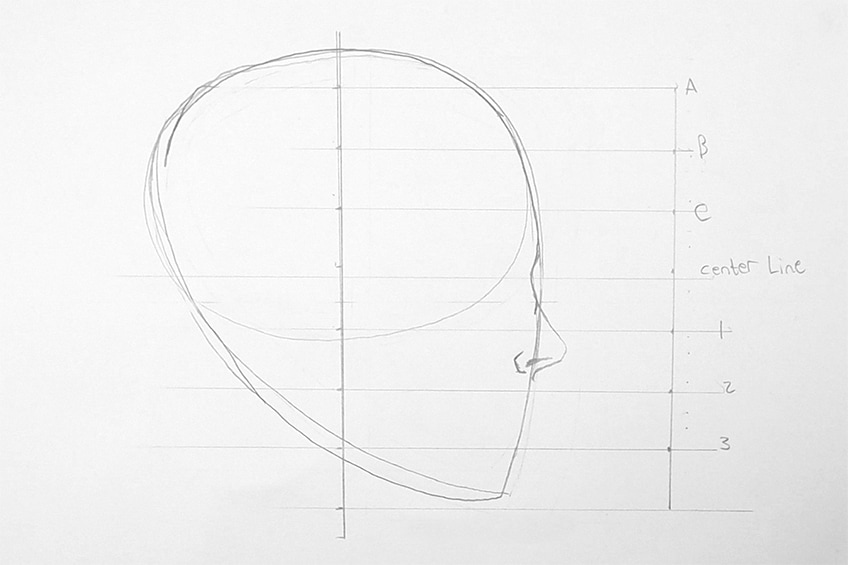
You can play around with how long you would like your nose to be or how you would like the ridge of the nose to protrude. The bottom of the nose then will extend into the upper lip, which will fall on line number two.
The upper and bottom lip should exist between lines two and three.
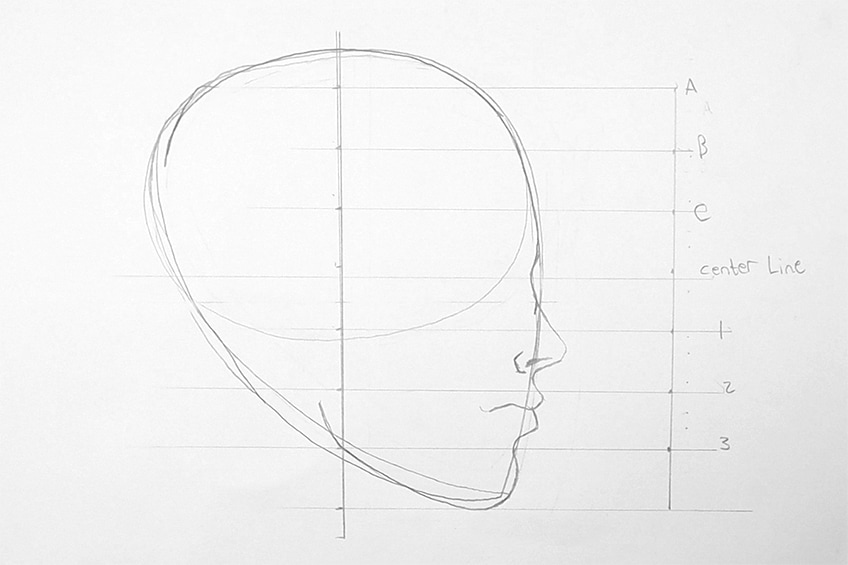
A single line can be drawn in a horizontal direction, dividing the upper and bottom lip, a rule to remember is that the upper lip is always slightly smaller than the bottom lip. The bottom lip will then extend into the chin which will go below line three, and should not protrude too much.
You want the chin to fall slightly behind or in line with the bottom lip.
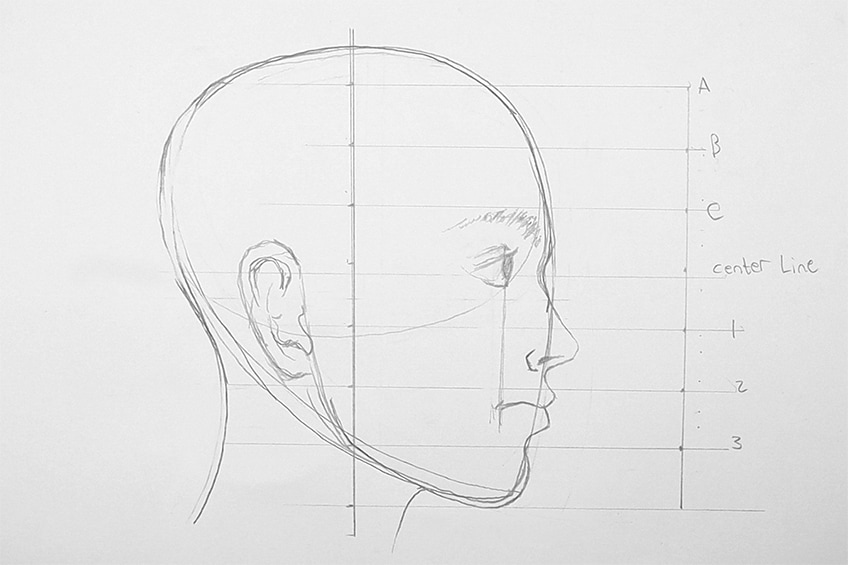
Drawing the Eye and Eyebrows
As we draw the eye, we can begin by placing it on the centerline. A good suggestion would be to draw a vertical line from the corner of the mouth directly up to the centerline. The eye should fall in line with the corner of the mouth.
It should also be placed on the centerline.
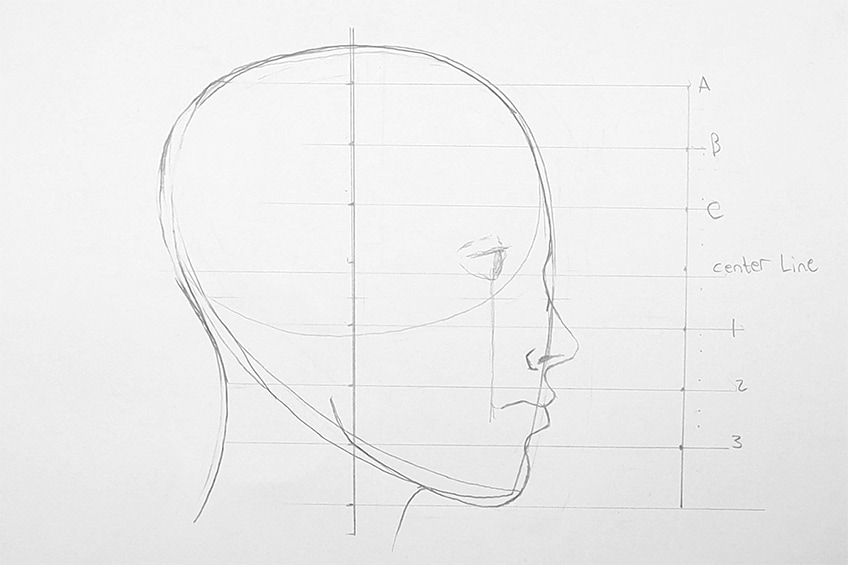
The shape of the eye could be imagined ad a triangle on its side, with the bottom of it facing towards the front of the face. From there we can simply round the flat surface, defining the shape of the eyeball a little more clearly.
From here, we can draw the eyebrows directly above the eye, keeping them below line C. The eye and the eyebrow should be placed between the center line and line C. The brow can be formed how you would like.
This means that it can be bushy or straight, it's completely up to you!
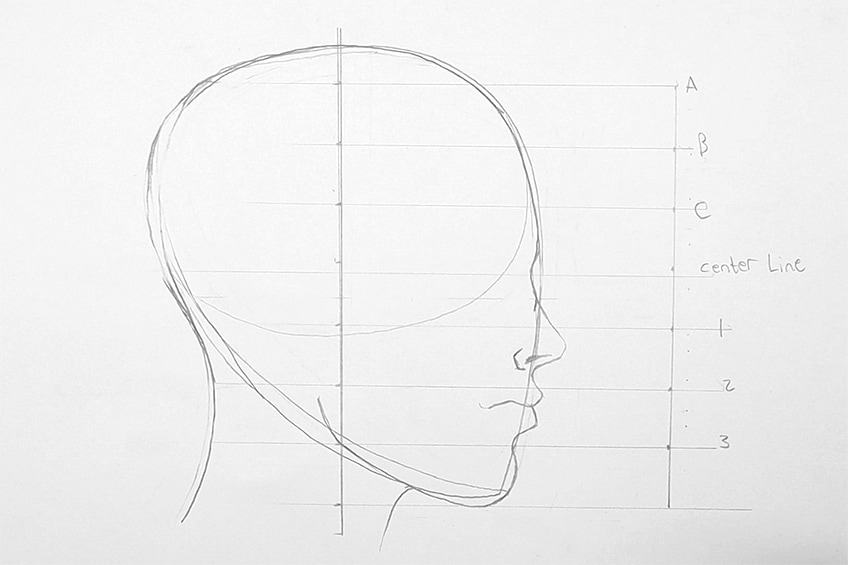
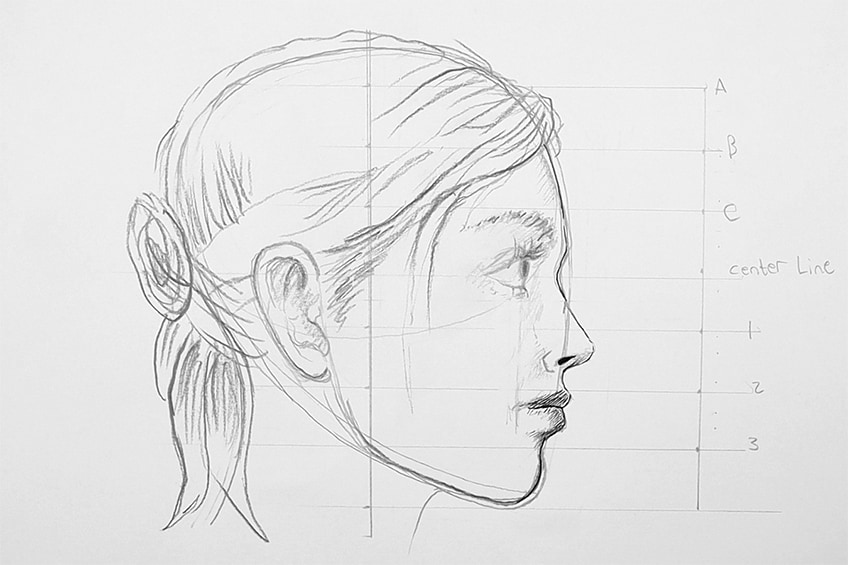
Drawing the Ear
The ear should be an extension of the jawline, the jawline should extend from below line three and move past the vertical middle line through the skull. The top of the ear should also fall along the horizontal axis in line with the eye level.
The bottom of the ear should be between lines one and two.
Drawing the Hair
We will now continue by drawing the hair onto the head of the female profile. Hair is quite a subjective thing, however, an important thing to remember is that it is not drawn inside or on top of the head. Rather, the hair should be drawn over the head and should have volume.
This means we can draw it slightly above the top of the skull.
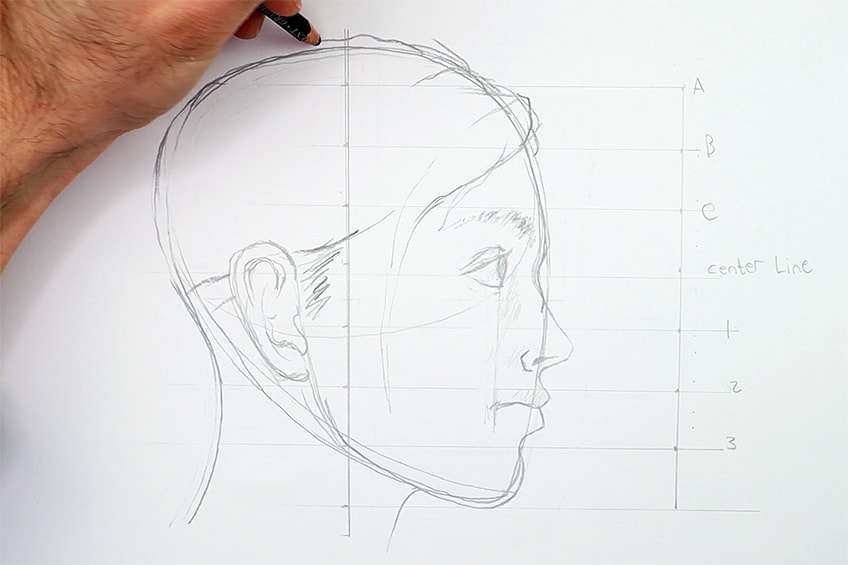
As you draw the hair you can play around with different styles. You do want to make sure that you imagine that the head is being wrapped or covered from the top to the back of the head. Another important aspect to remember is that the sideburns should fall in front of the ears.
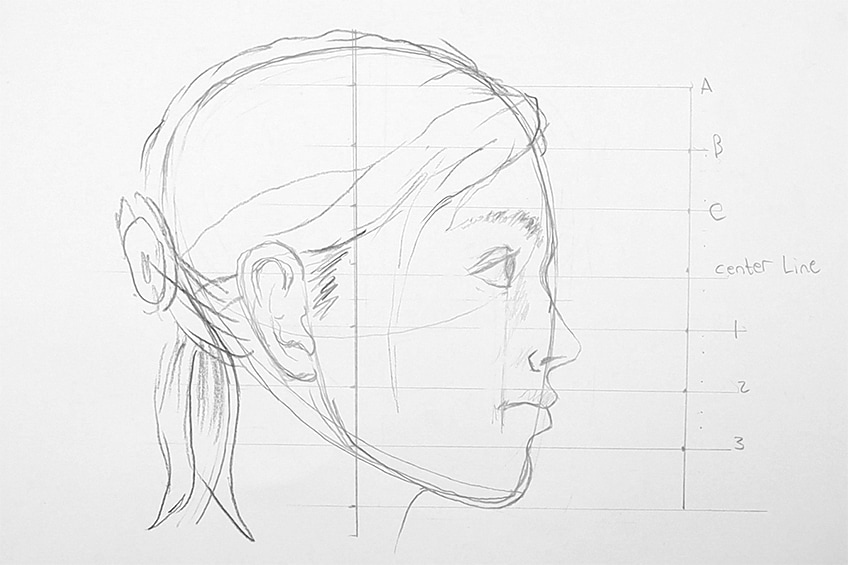
Making sure the hair covers the head and has some volume by being drawn slightly above the skull's lining is important to remember. Other than that, you can play around with how you shape and form the hairstyle.
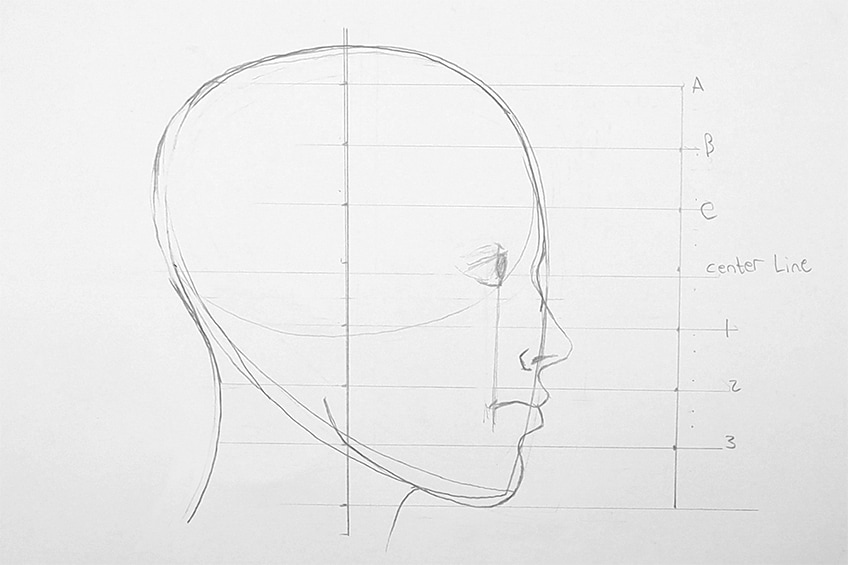
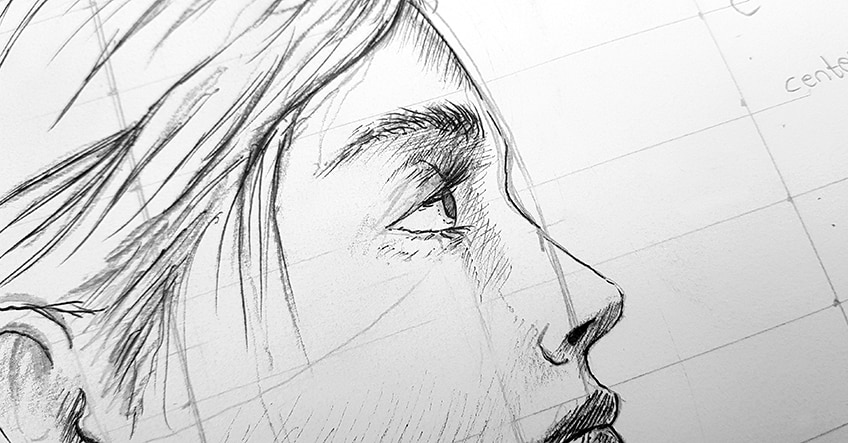
Adding in Light Shading
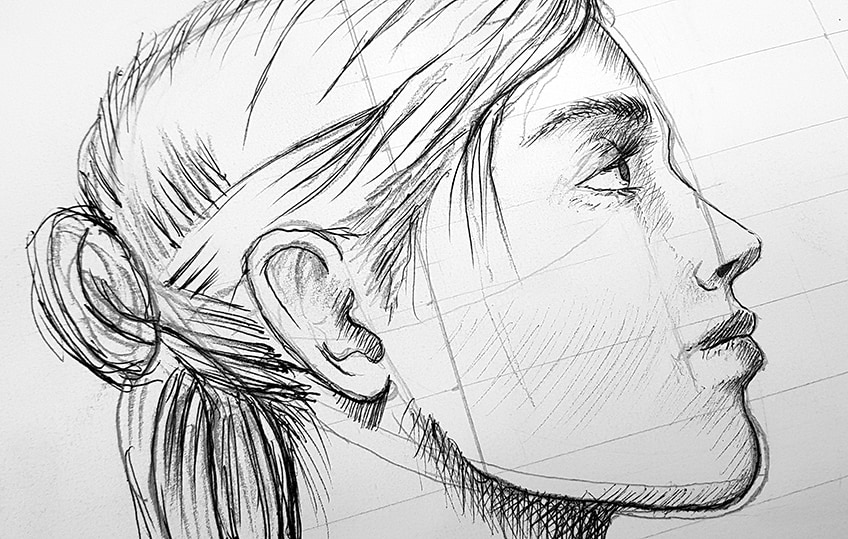
We can now add in some light shading with our pencils around the eyes, nose, and mouth. Around the eyes, we want to make sure that we add some shading underneath the eyebrows, suggesting that the brow ridge casts a shadow near the eye.
We can also darken the lips a little to suggest a different skin tone.
Adding in Darker Shading with a Pen
Now that we have a general sketch, we can add in some darker line work and shading with our ballpoint pens. We can start by going over our line work with our ballpoint pens. We can also proceed to shade over the shadows within the lips and around the nose area.
A cool idea is to give the female profile longer lashes in the eyes, which gives the profile a more feminine quality. Using a pen will just make the lashes darker and more vivid. We can also proceed to shade over the pencil marks under the brow.
After doing this, we can then go over the lines that make up the eyebrow.
We want to simply use the pen to go over all the details and the drawing in general. By doing this, we emphasize the features of the face a little more clearly. Adding in some darker marks helps to define the features and makes them stand out a little more.
Another great idea is to add some shading under the jaw. Again, this will accentuate the jawline and represent the shadow on the neck that is cast by the jaw. We can also add some shadowing under the ear to demonstrate the same effect near the ear.
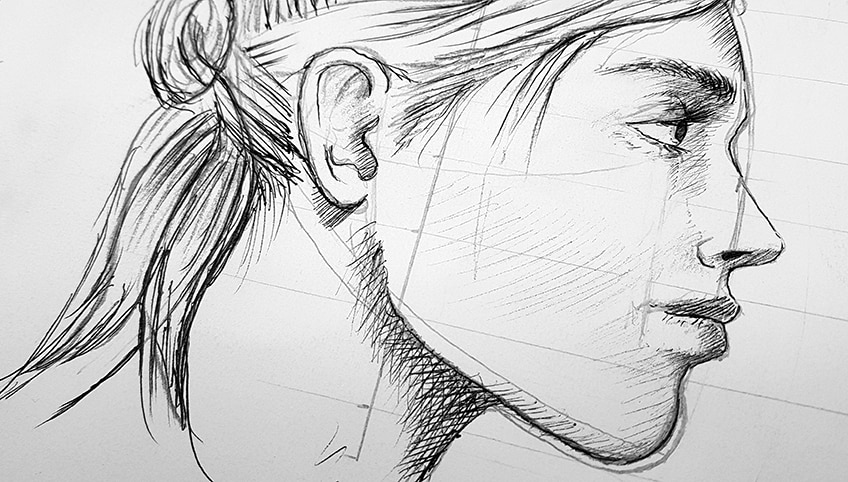
We can also go over the hair and add some basic strokes that make help to define the texture and flow of the hair. We simply add in some basic strokes to demonstrate the effect of contrasted and darker marks within the face drawing.
Just use this time to go over all the details within the face drawing to clarify the features that you have drawn. This is a way of showing you how using darker marks can be a great way to define a face a little more.
And there you have it! A simple guide demonstrating how to draw a face from the side with a few simple steps. Use the tricks and skills you have learned to play around with creating different faces.
Tips to Remember
- Take your time. Make sure you get the measurements right before drawing the face-side profile.
- The head is an oval. The oval shape is more accurate and similar to that of the skull, so don't draw a circle when forming the side face drawing.
- Look at images for referencing features. This method of drawing a face from the side can be done without a reference image, however, looking at faces helps to capture features a little more accurately.
- Don't worry about perfecting it the first time. This is a resource to come back to and the tricks are meant to be used for practice.
- The eye is never larger than the nose. This is a common mistake so remember that the eye is never larger than the nose from the face side profile.
- Experiment with changing features. Now that you know the drawing process, play around with changing the features in the side-profile drawing.
The process of learning how to draw a realistic side face drawing is really easy, once you have the measurements correctly drawn. Spend time on forming the head and beak shape so that you can have accurate lines and rows placed in the side face drawing. From there you can play around with how you form the details and how you would like them to look in the face side profile. Lastly, use shading as a tool to emphasize features within the side face drawing. Enjoy the process and use it as a means of practicing your own side-profile drawing.
Frequently Asked Questions
How Do You Adequately Draw the Eyes from the Side?
The eyes are quite simple to draw once you have figured out the measurements that divide the face into two sections. The eyes will always fall along the center plane between the lower and upper half of the face. We would think that the nose is the center of the face but rather it is the eyes. The eyes are also directly in line with the corner of the mouth, which is a great way to gauge how close it should be to the nose or front of the face. The shape of the eye is somewhat triangular turned on its side. The point should face inward whereas the flat section should face the nose or front of the face. The eye should never be larger than the nose, so use the nose for reference for scale. The flat side of the triangular shape can then be rounded to which will represent the eyeballs' curvature.
How Large Should the Head Be from a Side View?
When we draw the head, we always make it larger than it usually is because we instinctively want to place the hair on top of the head. However, when drawing a head, we must always account for the fact that the hairline does not sit on top of the head. Rather it sits near the forehead area and covers the head entirely. This is particularly true for females, where the intention is to draw the hair over the head. This means that the skull should sit under their hair rather than the hair being placed on top of the head like a helmet. You always want to draw hair over the skull rather than on top of the skull, which will result in a natural and realistic effect. The best way to start is to always consider where the hairline begins. From there, you can allow hair to fall over the skull rather than being placed on top of the skull. Lastly, the skull is more an oval shape rather than circular, so always start with an oval-shaped sketch rather than a circular-shaped sketch.
Source: https://artincontext.org/how-to-draw-a-face-from-the-side/
0 Response to "How to Draw Side Face of a Guy Easy"
Post a Comment